
| 일 | 월 | 화 | 수 | 목 | 금 | 토 |
|---|---|---|---|---|---|---|
| 1 | ||||||
| 2 | 3 | 4 | 5 | 6 | 7 | 8 |
| 9 | 10 | 11 | 12 | 13 | 14 | 15 |
| 16 | 17 | 18 | 19 | 20 | 21 | 22 |
| 23 | 24 | 25 | 26 | 27 | 28 | 29 |
| 30 | 31 |
- 안드로이드
- putextra
- 230508
- 데이터 타입
- 함수 인자
- Class
- ActionBar
- 프래그먼트
- DFS
- fragment
- 230510
- javascript
- intent
- C++
- Flutter
- null-safety
- 부가데이터
- textContent
- classList
- 인텐트
- DOMContentLoaded
- string
- html
- serializable
- parcelable
- ViewPager
- querySelector
- 생명주기
- Adapter
- 230503
- Today
- Total
나만의 개발노트
[안드로이드] 프래그먼트 (Fragment), FragmentManager 본문
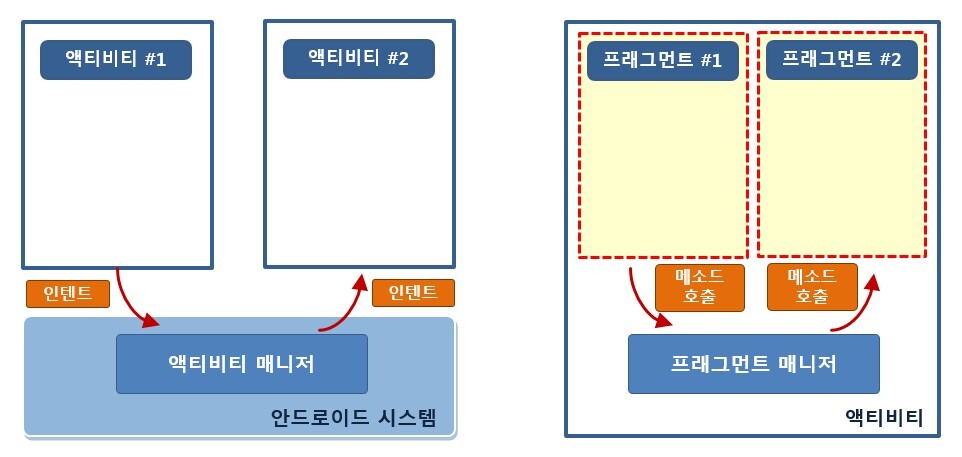
프래그먼트(Fragment)
- 하나의 액티비티에 부분화면을 독립적으로 사용할 수 있게 해줌
- 여러 개의 프래그먼트를 하나의 액티비티에 결합하여 창이 여러 개인 UI를 빌드할 수 있음
- 하나의 프래그먼트를 여러 액티비티에서 재사용할 수 있음
- 액티비티와 동작하는 방식이 매우 유사함
(액티비티와 시스템의 관계 = 프래그먼트와 액티비티(FragmentManager)의 관계)
-> 시스템이 직접 관리하지 않아 가볍게 전환할 수 있
프래그먼트의 수명주기 (Life Cycle)
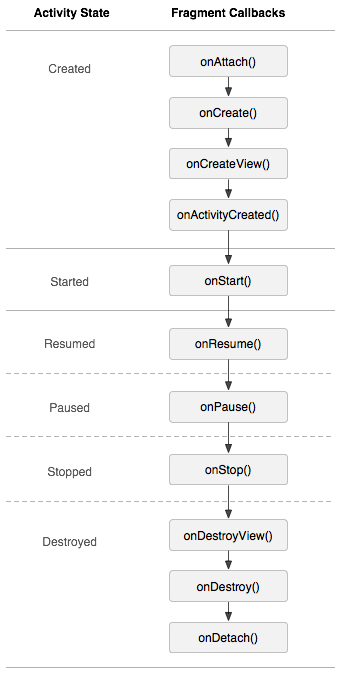
- Activity의 생명주기와 비슷함
- 액티비티에 대한 수명주기 콜백이 발생하면,
프래그먼트에 대해 비슷한 콜백을 발생시킨다
ex) 액티비티가 onPause()를 받으면,
해당 액티비티 내의 각 프래그먼트가 onPase()를 받음
[Activity와 다른 수명주기 콜백]
onAttach()
프래그먼트가 액티비티와 연결되어 있었던 경우 호출
= 액티비티에 프래그먼트가 올라오는 시점
(Activity가 전달 됨)
onCreateView()
프래그먼트와 연결된 뷰 계층을 생성하기 위해 호출
= 인플레이션 되는 시점
onActivityCreated()
액티비티의 onCreate() 메서드가 반환할 때 호출
onDestroyView()
프래그먼트와 연결된 뷰 계층이 제거되는 중일 때 호출
onDetach()
프래그먼트가 액티비티와 연결이 끊어지는 중일 때 호출
참고 :
https://developer.android.com/guide/components/fragments?hl=ko#Lifecycle
프래그먼트 사용방법
1. XML 레이아웃 파일을 만들고, Fragment.java 에 onCreateView() 에 인플레이션 한다
public static class ExampleFragment extends Fragment {
    @Override
    public View onCreateView(LayoutInflater inflater, ViewGroup container,
                             Bundle savedInstanceState) {
        // Inflate the layout for this fragment
        return inflater.inflate(R.layout.example_fragment, container, false);
    }
}
- 매개변수 container는 상위 ViewGroup(액티비티 레이아웃으로부터), 이 안에 프래그먼트 레이아웃이 삽입됨
- 매개변수 savedInstanceState는 일종의 Bundle -> 프래그먼트 이전 인스턴스에 대한 데이터를 제공
2. 액티비티에 프래그먼트 추가
방법 1-1) XML파일에 <fragment>태그로 선언
//트랜잭션을 수행하지 않을 때 (프래그먼트 추가, 제거, 교체)
<?xml version="1.0" encoding="utf-8"?>
<LinearLayout xmlns:android="http://schemas.android.com/apk/res/android"
    android:orientation="horizontal"
    android:layout_width="match_parent"
    android:layout_height="match_parent">

    <!-- android:name에는 원하는 프래그먼트 입력 -->
    <!-- android:id를 적지 않으면, 오류남 -->
    <fragment android:name=""com.example.examplefragment.FirstFragment""
            android:id="@+id/fragment"
            android:layout_weight="1"
            android:layout_width="0dp"
            android:layout_height="match_parent" />
</LinearLayout>
방법 1-2) MainActivity에서 findFragmentById()를 통해 프래그먼트 참조
package com.example.examplefragment;

import androidx.appcompat.app.AppCompatActivity;
import androidx.fragment.app.FragmentManager;
import androidx.fragment.app.FragmentTransaction;

import android.os.Bundle;
import android.util.Log;
import android.view.View;
import android.widget.Button;

public class MainActivity extends AppCompatActivity {

    FirstFragment fragment1;
    SecondFragment fragment2;
    FragmentManager manager;

    @Override
    protected void onCreate(Bundle savedInstanceState) {
        super.onCreate(savedInstanceState);
        setContentView(R.layout.activity_main);

        manager = getSupportFragmentManager();

        fragment1 = (FirstFragment) manager.findFragmentById(R.id.firstFragment);
        fragment2 = (SecondFragment) manager.findFragmentById(R.id.secondFragment);
    }

}
방법 2-1) java 파일에 코드로 선언
//트랜잭션을 수행할 때 (프래그먼트 추가, 제거, 교체)
//Fragment 생성
FirstFragment fragment1 = new FirstFragment();
방법 2-2) FragmentManager를 통해 참조
package com.example.examplefragment;

import androidx.appcompat.app.AppCompatActivity;
import androidx.fragment.app.FragmentManager;
import androidx.fragment.app.FragmentTransaction;

import android.os.Bundle;
import android.util.Log;
import android.view.View;
import android.widget.Button;

public class MainActivity extends AppCompatActivity {

    @Override
    protected void onCreate(Bundle savedInstanceState) {
        super.onCreate(savedInstanceState);
        setContentView(R.layout.activity_main);
		//Fragment 생성
        FirstFragment fragment1 = new FirstFragment();

		//button1 을 누르면 R.id.fragmentContainer에 firstFragment가 뜨게 하기
        Button button1 = findViewById(R.id.button1);
        button1.setOnClickListener(new View.OnClickListener() {
            @Override
            public void onClick(View v) {
                getSupportFragmentManager().beginTransaction().replace(R.id.fragmentContainer,fragment1).commit();
            }
        });
    }
}
[실습 - 하나의 Activity에 두 Fragment 전환할 수 있게 만들기]
#activity_main.xml
<?xml version="1.0" encoding="utf-8"?>
<LinearLayout xmlns:android="http://schemas.android.com/apk/res/android"
    android:layout_width="match_parent"
    android:layout_height="match_parent"
    android:orientation="vertical">

    <TextView
        android:id="@+id/textView"
        android:layout_width="wrap_content"
        android:layout_height="wrap_content"
        android:layout_gravity="center"
        android:text="메인 액티비티"
        android:textSize="40dp"/>

    <Button
        android:id="@+id/button1"
        android:layout_width="wrap_content"
        android:layout_height="wrap_content"
        android:layout_gravity="center"
        android:textSize="20dp"
        android:text="first 실행"/>

    <Button
        android:id="@+id/button2"
        android:layout_width="wrap_content"
        android:layout_height="wrap_content"
        android:layout_gravity="center"
        android:textSize="20dp"
        android:text="second 실행"/>

    <FrameLayout
        android:id="@+id/fragmentContainer"
        android:layout_width="match_parent"
        android:layout_height="match_parent"/>

<!--    <fragment-->
<!--        android:id="@+id/fragment"-->
<!--        android:name="com.example.examplefragment.FirstFragment"-->
<!--        android:layout_width="match_parent"-->
<!--        android:layout_height="match_parent" />-->

</LinearLayout>
#fragment_first.xml
<?xml version="1.0" encoding="utf-8"?>
<LinearLayout xmlns:android="http://schemas.android.com/apk/res/android"
    android:layout_width="match_parent"
    android:layout_height="match_parent"
    android:background="#03A9F4"
    android:orientation="vertical">

    <TextView
        android:id="@+id/textView"
        android:layout_width="wrap_content"
        android:layout_height="wrap_content"
        android:layout_gravity="center"
        android:text="First Fragment"
        android:textSize="40dp"/>

    <Button
        android:id="@+id/moveButton"
        android:layout_width="wrap_content"
        android:layout_height="wrap_content"
        android:layout_gravity="center"
        android:textSize="20dp"
        android:text="second 열기"/>
</LinearLayout>
#fragment_second.xml
<?xml version="1.0" encoding="utf-8"?>
<LinearLayout xmlns:android="http://schemas.android.com/apk/res/android"
    android:layout_width="match_parent"
    android:layout_height="match_parent"
    android:background="#FFEB3B"
    android:orientation="vertical">

    <TextView
        android:id="@+id/textView"
        android:layout_width="wrap_content"
        android:layout_height="wrap_content"
        android:layout_gravity="center"
        android:text="Second Fragment"
        android:textSize="40dp"/>

    <Button
        android:id="@+id/moveButton"
        android:layout_width="wrap_content"
        android:layout_height="wrap_content"
        android:layout_gravity="center"
        android:textSize="20dp"
        android:text="first 열기"/>
</LinearLayout>
#MainActivity.java
package com.example.examplefragment;

import androidx.appcompat.app.AppCompatActivity;
import androidx.fragment.app.FragmentManager;
import androidx.fragment.app.FragmentTransaction;

import android.os.Bundle;
import android.util.Log;
import android.view.View;
import android.widget.Button;

public class MainActivity extends AppCompatActivity {

    FirstFragment fragment1;
    SecondFragment fragment2;

    @Override
    protected void onCreate(Bundle savedInstanceState) {
        super.onCreate(savedInstanceState);
        setContentView(R.layout.activity_main);

        fragment1 = new FirstFragment();
        fragment2 = new SecondFragment();

        Button button1 = findViewById(R.id.button1);
        button1.setOnClickListener(new View.OnClickListener() {
            @Override
            public void onClick(View v) {
                getSupportFragmentManager().beginTransaction().replace(R.id.fragmentContainer,fragment1).commit();
            }
        });

        Button button2 = findViewById(R.id.button2);
        button2.setOnClickListener(new View.OnClickListener() {
            @Override
            public void onClick(View v) {
                getSupportFragmentManager().beginTransaction().replace(R.id.fragmentContainer,fragment2).commit();
            }
        });
    }

    public void switchFragment(int index){
        if(index==1){
            getSupportFragmentManager().beginTransaction().replace(R.id.fragmentContainer,fragment1).commit();
        }else if(index==2){
            getSupportFragmentManager().beginTransaction().replace(R.id.fragmentContainer,fragment2).commit();
        }
    }
}
#FirstFragment.java
package com.example.examplefragment;

import android.content.Context;
import android.os.Bundle;
import android.util.Log;
import android.view.LayoutInflater;
import android.view.View;
import android.view.ViewGroup;
import android.widget.Button;
import android.widget.Toast;

import androidx.annotation.NonNull;
import androidx.annotation.Nullable;
import androidx.fragment.app.Fragment;

public class FirstFragment extends Fragment {

    private final static String TAG = "myFragment";
    MainActivity activity;
    @Override
    public void onAttach(@NonNull Context context) {
        super.onAttach(context);

        //이 Fragment가 올라가 있는 Activity 참조
        activity = (MainActivity) getActivity();
    }

    @Override
    public void onDetach() {
        super.onDetach();

        //Activity 참조 초기화
        activity = null;
    }

    @Override
    public View onCreateView(@NonNull LayoutInflater inflater, @Nullable ViewGroup container, @Nullable Bundle savedInstanceState) {
        // container은 액티비티 레이아웃에 있는 ViewGroup. 프래그먼트 레이아웃이 삽입될 곳
        ViewGroup rootView = (ViewGroup) inflater.inflate(R.layout.fragment_first,container,false);

        //fragment_first.xml 의 "second 열기" 버튼을 누르면, activity를 통해 'SecondFragment' 열기
        Button moveButton = (Button) rootView.findViewById(R.id.moveButton);
        moveButton.setOnClickListener(v->{
            activity.switchFragment(2);
        });
        return rootView;
    }
}
#SecondFragment.java
package com.example.examplefragment;

import android.content.Context;
import android.os.Bundle;
import android.view.LayoutInflater;
import android.view.View;
import android.view.ViewGroup;
import android.widget.Button;

import androidx.annotation.NonNull;
import androidx.annotation.Nullable;
import androidx.fragment.app.Fragment;

public class SecondFragment extends Fragment {
    MainActivity activity;

    @Override
    public void onAttach(@NonNull Context context) {
        super.onAttach(context);

        activity = (MainActivity) getActivity();
    }

    @Override
    public void onDetach() {
        super.onDetach();

        activity = null;
    }

    @Override
    public View onCreateView(@NonNull LayoutInflater inflater, @Nullable ViewGroup container, @Nullable Bundle savedInstanceState) {
        // container은 액티비티 레이아웃에 있는 ViewGroup. 프래그먼트 레이아웃이 삽입될 곳
       ViewGroup rootView = (ViewGroup) inflater.inflate(R.layout.fragment_second,container,false);

        Button moveButton = (Button) rootView.findViewById(R.id.moveButton);
        moveButton.setOnClickListener(v->{
            activity.switchFragment(1);
        });

        return rootView;
    }
}
[참조]
https://developer.android.com/guide/components/fragments?hl=ko
프래그먼트 | Android 개발자 | Android Developers
A Fragment represents a behavior or a portion of user interface in an Activity. You can combine multiple fragments in a single activity to build a multi-pane UI and reuse a fragment in multiple activities. You can think of a fragment as a modular section
developer.android.com
https://www.boostcourse.org/mo316/lecture/259061?isDesc=false
안드로이드 앱 프로그래밍
부스트코스 무료 강의
www.boostcourse.org
'[안드로이드] > [안드로이드] 공부 기록' 카테고리의 다른 글
| [안드로이드] 액션바(ActionBar)에 탭(Tab) 만들기 (0) | 2023.12.07 |
|---|---|
| [안드로이드] 옵션메뉴(OptionMenu), 액션바 (ActionBar) (2) | 2023.11.24 |
| [안드로이드] 권한, 위험권한, permission, RECEIVE_SMS (0) | 2023.11.16 |
| [안드로이드] 브로드캐스트 수신자, onReceiver, SMS메시지 수신 어플 (0) | 2023.11.10 |
| [안드로이드] 서비스, startService, onStartCommand (0) | 2023.10.13 |


